DIY Solar Water Pump: How It Works and Things to Consider
DIY solar water pump has become one of the most effective and pocket-friendly approaches for fulfilling the water needs in any garden. Getting such an uninterruptible water supply can help you irrigate crops, provide fountains, ponds, or swimming pools with fresh water, or even supply water to off-grid houses.
The low cost of setting up a DIY Solar water pump makes it an excellent one-time investment. You can even convert an electric fountain pump to a solar fountain. But how does it work, and what factors should you consider during the project?
Keep reading to find out!
What Is a DIY Solar Water Pump?
A DIY Solar water pump simply means setting up a solar-powered pumping system all by yourself (Do-It-Yourself).
A solar water pump runs on DC (Direct Current), which is different from normal electric pumps because they use AC (Alternating Current). Once the solar panels produce DC, it delivers to the controller and the pump.
In no time, water begins to pump out from the source. However, you’ll need a few components, tools, and materials to succeed with the project.
How Does Solar Water Pumping Work?
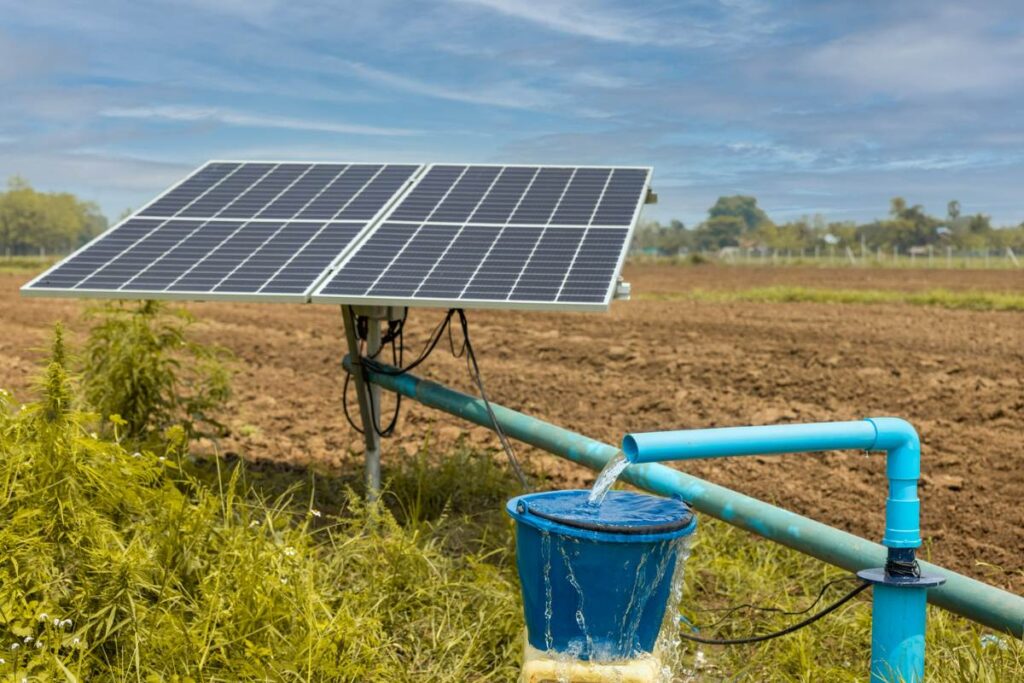
A DIY solar water pump comprises solar panels, a DC water pump, and a controller. They come in a separate system with a simple build. When appropriately wired and set up, the solar array generates DC electricity to the pump, bringing forth water in return.
Essentially, The solar panels collect photons from sunlight. Then the solar water pump converts the photons (sun’s rays) to the DC (direct current) that powers the motor to pump water from its source.
If the motor requires alternating current (AC) to operate, then there’s a need for an inverter. Since the system depends on sunlight energy for full operations, you may also need a backup battery. It will always come in handy at night or during cloudy days.
Knowing what a DIY solar pump is and how it works, it’s time to start the project. Don’t worry; the rest of this content will guide you through the processes.
Tips for Setting Up a DIY Solar Water Pump
DIY solar water pump is cost-effective. However, it can cost you a handsome of money when you pick poor-quality materials for the projects.
Here are some tips to remember to get the best out of this project.
Know the Materials You Need
When building a solar water pump system, you’ll need a DC water pump, solar panels, solar charge controller, or solar pump controller. Also, you’ll need a backup battery for support during cloudy days.
Choosing the materials depends on your water needs. For instance, if you need to supply your house or a deep well with water, you can use a submersible DC water pump with 270W power. The panels for the pump can be around 500W and will work perfectly. You may not need a backup battery, but it’s worth having.
For pond circulation or swimming pool, two solar panels with up to 350W will power a surface DC pump with a 500W pump power. A submersible 1500W pump for agricultural irrigation will work fine with five solar panels that can produce 400W each.
If you need water for an RV or boat circulation pump, an in-line 70W water pump with 10A or 12V pump controllers will work perfectly with a 100W solar panel. Here, you’ll need a 12V, 10Ah backup battery.
Choose a DC Water Pump
DC water pumps are the best solar water pumps. Apart from the advantages of AC pumps, solar water pumps with DC (direct current) don’t need any inverter. Also, they’re highly efficient, enabling them to pump more water than AC pumps.
Furthermore, DC pumps are very compatible with photovoltaic panels because the panels produce the DC electricity the pumps need. This ensures a highly efficient water pumping system as the water will pump directly without the need for converters.
Pick an Appropriate Pump Controller
The pump controller optimizes the electricity supply from the solar panel array to the solar water pump. It helps the pump to get the appropriate DC voltage and the highest current for utmost efficiency. Also, it controls and prevents power fluctuation in the solar pumping system.
Some controllers have a water sensor for automatic commands (Start/Stop). Some have Wi-Fi connections to help users monitor water progress, solar energy, etc., from different ranges.
When selecting the best pump controller for the solar pumping project, consider the MPPT solar pump controller. Its ability to harvest solar energy and connect to a backup battery in low sunlight makes it the best and most efficient solar pump controller.
Know the Power And Voltage of Your Electrical Materials
Knowing the volt and power of your solar panels, water pump, controller, and battery helps you to determine the most compatible materials for the project. For instance, if your solar water pump is 70W with a max current of 5.8A but works well at 12V, consider a 12V solar controller with a 10A max load.
Most times, several DC pumps come with pump-dedicated controllers. If your DC solar pump has a follow-come controller, you don’t have to get a new one. However, if the need arises, check the power and voltage for your pump, battery, and panels to help you find the perfect match.
Know the Right Number of PV Panels You Need
Making estimates in solar-based projects is not a good practice. Whether it’s about voltage, power, brand, or the number of panels, don’t estimate; instead, make comprehensive calculations.
For your solar pump project, you must understand your water needs, your location’s solar irradiation, and the operation span of the system. This is the best way to know the right number of panels you need.
If you want more water, your pump will operate longer. Thus you need more solar panels with more power.
Assuming you want to run a circulation pump for your pool. Let’s say 12 hours makes the day, and the pool’s capacity is 100m3 (26,500gal), equivalent to 8.3m3/hour (2,200gal/hour).
The maximum flow rate of a 500W solar pump is 18m3/hr (4,500gal/hr). Thus, it’ll take about 6 hours to pump water across the swimming pool.
The job will use up to 3kWh (6 hours x 500W) of electricity. With this calculation, you can now know the number of panels producing up to 3 kWh daily.
To make it easier, you can check the voltage output of your solar panels.
Have a Backup Battery
Adding a backup battery to your solar water pumping system depends on how you use the system. Circulation pumps or irrigation won’t need an additional battery. However, if you’re dealing with a storage tank, a boat, or an RV, you’ll need a battery to support your pump in cloudy conditions.
Once your solar array converts sunlight into direct current (DC) electricity, it’s automatically stored in the backup battery for future use.
Lithium batteries are highly recommendable as they’re more durable and efficient than lead-acid batteries. With a 12V, 10Ah lithium backup battery, you can initiate a water flow at any convenient time.
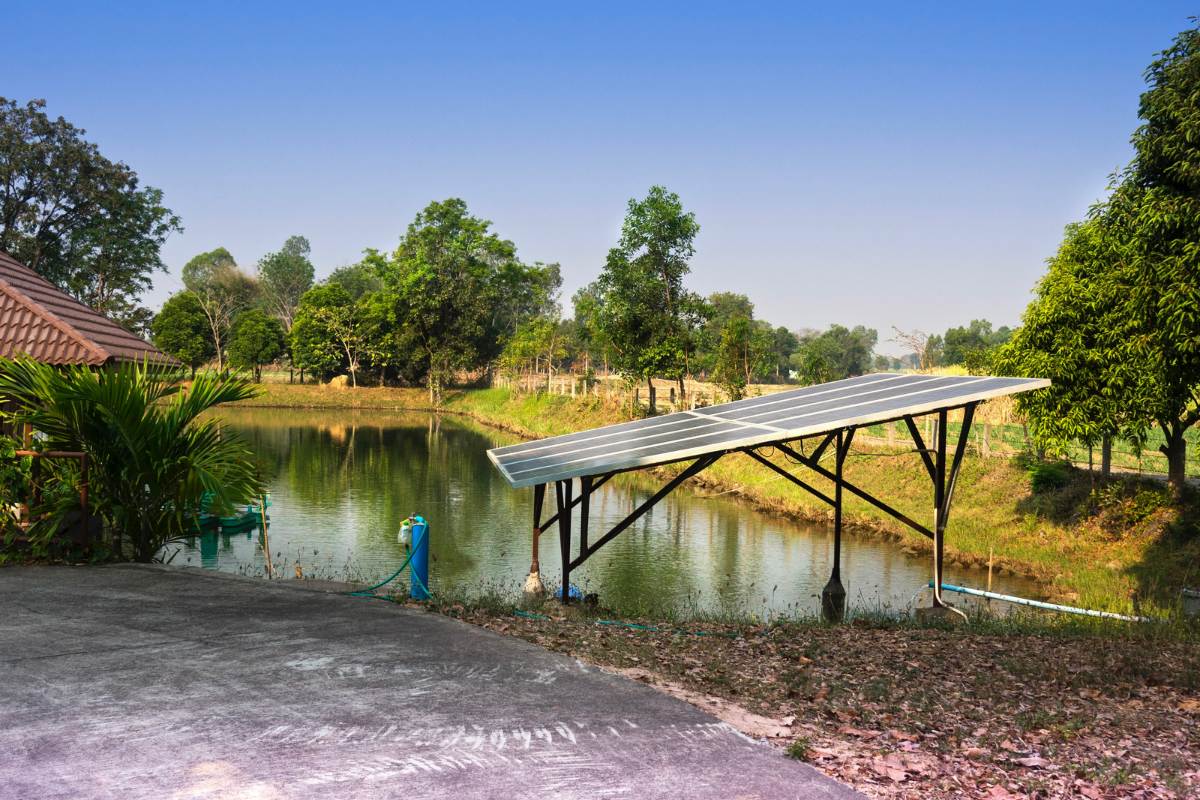
Use a Precise Angle When Hanging the Panels
Wrong panel angles can affect the performance of your DIY solar water. Whether it’s an off-grid house or an open field, you must hang the solar panels in a way there would be direct sunlight on them.
Find an angle between 30o and 45o degrees to ensure your solar pump gets the maximum efficiency from the solar pump system.
These are the tips for setting up a solar pump system for water supply.
Setting Up a Diy Solar Water Pump: Step-by-step Guide
Knowing the tips above, let’s set up a solar-powered water pumping station. Find the step-by-step guide below.
Gather Materials
Get the appropriate number of solar panels you need for the project. Get the best DC water pump that will work in various use cases (submersible, ground surface, or in-line).
If you have an AC pump, you’ll need an inverter to convert the current to an alternating electric current (AC). Bring pipes that will move the water from its source to your preferred destination (storage tank, purification system, farm for irrigation, etc.).
Most importantly, get a pump controller. It will regulate the power on and off of the water pump, increasing the life span of the pump. The controller will also protect the pump from electricity fluctuations and motor damage due to dry water sources.
Pick a Site for the Array and Pump
Explore your environment to find the best site for your water pump. Consider the water source in the area and its characteristics in terms of availability and quality. This will help you pick the perfect site for your project.
In the course, look out for a spot for the solar array. Advisably, keep the array in range with the pump. Since power loss can occur when current travels through a long distance, keeping the distance between your connections close, including the controller, the water pump, and the solar panels, is advisable.
Dig up and Install the Water Pump and Solar Array
After choosing the best site for your project, start digging based on your preferred water pump. For example, a submersible water pump can go as deep as 700ft to lift water, while a surface pump can work around 10 to 20ft deep.
After that, run the piping from the water pump to your preferred destinations (farm, pool, well, storage tank, etc.) and seal the ground where the pump is installed.
Dig the site you picked for installing your solar array. Consider digging a 2ftx2ftx2ft for the array to get a stronger base for the solar panels. After digging, construct the I-beams and C-channels to carry the solar panels.
Once you finish the construction, line up your panels and complete the wiring. Link the panels and connect them to the solar pump system and controller. In this stage, involve an experienced electrician to avoid wrong wire connections.
Consider a Backup
Consider connecting a battery to support the solar system during cloudy conditions. However, ensure that your controller supports battery charging. You can read the leaflet of the controller to learn more about it.
Once you have all these settings, your solar water pumping system is ready. Notice how water will pump out when the sun hits the panels. As mentioned earlier, this system will save you a lot of money.
FAQs
How Much Can This Solar Pump Project Cost?
The cost of setting up a DIY solar pump system will range between $300 to $3000, depending on the purpose of the system. For example, an RV or boat circulation pump will cost roughly $300 when you add $100 for a DC water pump, $70 for the controller, $130 for the solar array, and $100 for a battery.
How Many Watts of Panels Are Ideal for Pumping Water?
Depending on the pump power and voltage, 100-watt panels or 375-watt panels are recommendable. They are more efficient and will give you their best performance.
How Deep Can a Solar Pump Reach to Pump Water?
It depends on the kind of pump you’re working with. A surface or in-line pump can stay around 100 feet or shallow water level, while submersible pumps can go up to 400 feet deep.
Are there Disadvantages of Solar Pumping Systems?
The possible disadvantages of this system are that it depends on the levels of solar radiation and the cost of setting it up is quite expensive. Nevertheless, having one or more backup batteries can be your best bet. Furthermore, since the panels are in open fields, they’re prone to theft.
What Is the Life Span of Solar Pumps?
Solar pumps can last 10 to 20 years, based on their uses and types. Running the pump non-stop will cut down its lifespan. Thus, consider having a storage drum to hold water so you can turn off the system for some time.
DIY solar water pump is a one-time investment. Initially, setting up is costly, but its use cases are worth it. Also, its environmental effect benefits humanity as it’s an eco-friendly project that produces no chemicals during operations.
Before setting up a DIY solar pump, remember a few tips. These include knowing the necessary materials, choosing your sites, and knowing the number of panels needed. With these, you can build a solar pump without hassles.